Top 10 Reasons Your Ribbon Printer Keeps Snapping Foil

Time:2026-09-28 Author:Amelia
0%

A ribbon that snaps mid-job can turn a routine label run into a trail of blank labels, wasted foil, and repeated stops. Why is my ribbon printer snapping the foil? The answer is rarely one part alone. Excessive printhead heat, incorrect ribbon tension, a misaligned roll, sharp media edges, or a worn printhead can each strain the film. The warning signs are often small: a crease near the spindle, foil clinging to the label, or a faint scraping sound.

Industry context helps, but it cannot diagnose one machine. AWA Alexander Watson Associates’ market research tracks thermal-transfer materials and label-industry trends; it does not establish a universal ribbon-breakage rate. Zebra Technologies’ thermal-transfer setup and troubleshooting guidance emphasizes matching ribbon, media, and printer settings. ISO/IEC 15416 provides a recognized method for assessing printed barcode quality, though it does not identify why foil breaks. These sources offer useful boundaries—not a substitute for checking the actual printer.

This guide examines ten practical causes, from over-tight take-up spindles to dust and incompatible supplies. Start with the simplest checks: pause the job, inspect the ribbon path, and compare the ribbon width with the label stock. Small details matter. A slightly skewed roll can pull like a thread under tension. Still, not every snap has a tidy explanation; damaged or inconsistent ribbon can behave unpredictably. That uncertainty deserves a careful check, not another guess.
Top 10 Reasons Your Ribbon Printer Keeps Snapping Foil

How Thermal Transfer Foil Moves Through a Ribbon Printer

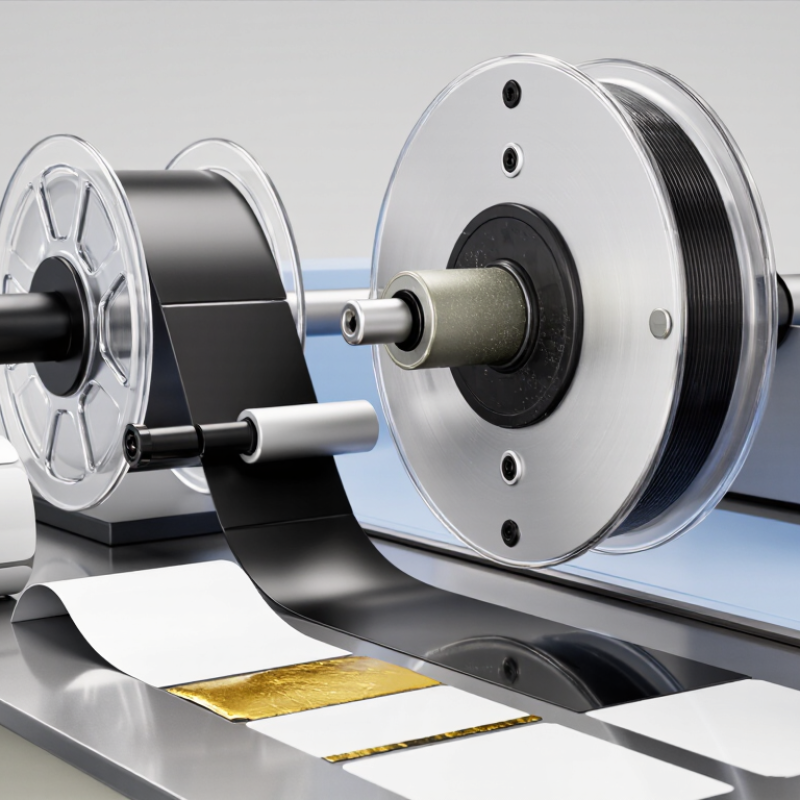
Thermal transfer foil follows a defined path inside a ribbon printer. It unwinds from the supply spindle, passes over guide rollers, crosses the printhead, and winds onto the take-up spindle. The coated side faces the label or other print material. At the printhead, small heated elements transfer the coating onto the surface. The thin carrier film keeps moving. A tiny wrinkle can matter more than it looks.

Foil tension must stay steady as the printer feeds and rewinds. If the take-up spindle pulls too hard, or a guide roller adds drag, the ribbon can stretch and snap. Poor alignment may make an edge rub against a guide. Dust, a worn roller, or an incorrect ribbon path can also cause trouble. Heat settings matter, too: excessive heat can increase friction and strain. I would not assume the foil itself is faulty before checking its route and tension.

Tips: With the printer off, check that the ribbon is threaded smoothly and centered across the rollers. Look for creases, rough edges, or debris. Confirm the supply and take-up spindles turn freely, then use the recommended heat and speed settings. Change one setting at a time; it is easy to miss the real cause when several things change together.

What Foil Snapping Reveals About the Printing Process

Foil snapping is a process signal, not just a nuisance. In thermal-transfer printing, the thin polyester carrier must travel evenly while the printhead applies heat and pressure. Technical data sheets for thermal-transfer ribbons commonly list carrier films around 4.5–6 micrometres thick. That leaves little room for rough handling or uneven tension. ASTM D882-18 describes how to test tensile properties of thin plastic sheeting; it does not set a universal printer-tension limit. A snap near the supply roll may point to excessive drag. A break beside the printhead can indicate wrinkles, a dirty platen, or heat set too high. Small clues matter.

Tips: Check the ribbon path for sharp edges, then rotate the platen by hand with the printer off. Reduce print speed or darkness one step at a time, and record each change. A useful test is printing a short run with fresh ribbon. If the foil still breaks, inspect alignment and tension rather than blaming the roll immediately.

The pattern can reveal how the whole process behaves. Repeated breaks at the same point suggest a mechanical snag; breaks in changing locations may indicate unstable tension or damaged foil. Room conditions matter, too. Dust on a sensor or a curled label can disturb tracking. I would not treat every snap as proof of a faulty ribbon. That assumption is tempting, and sometimes wrong. Keep a simple log: ribbon type, speed, darkness, break location, and room conditions. Over several runs, the cause often becomes visible.

Top 10 Reasons Your Ribbon Printer Keeps Snapping Foil

What foil snapping can reveal about the printing process

Read the bars as a practical inspection order, not measured failure-rate statistics. Start with foil tension and the ribbon path, then check guides, rollers, ribbon fit, and print settings. Persistent snapping may require checking foil compatibility and the printer’s feed and take-up mechanisms.

How Heat, Pressure, and Speed Settings Can Break Foil

A ribbon usually snaps when heat, pressure, and speed stop working together. Too much heat can soften the carrier film and make it stretch or tear; too little can leave foil stuck to the ribbon, creating a sudden pull at the next print. Higher speed shortens the time each area spends under the heated head. Operators sometimes raise heat to compensate, but that can make the carrier less forgiving. It is tempting to blame the foil. Sometimes the settings are the real culprit.

Start with the media supplier’s recommended range, then change one setting at a time. Reduce heat slightly if the ribbon looks wavy or feels brittle; lower pressure if foil gathers at the head or edges. Slow the feed briefly to check whether the break disappears. Look closely at the unwind path, too. A dusty guide or sharp edge can add drag. ASTM D882 describes tensile testing for thin plastic films, while ASTM D1894 measures film friction. These methods identify useful comparison data: elongation, tensile strength, and friction. Record those values alongside printer settings when comparing foil lots. A small flaw in the setup can matter more than a dramatic setting change. Still, a single test roll may mislead; repeat the check after the machine warms up.

How Ribbon, Media, and Printer Parts Contribute to Snapping

A ribbon can snap when tension is uneven, the roll is fitted incorrectly, or the ribbon path catches on a guide. Check that the supply roll turns freely and the take-up core is seated straight. Look for creases, loose edges, or foil dust near the rollers. Small flaws matter.

Media can contribute, too. Rough, dusty, or mismatched stock increases drag as it passes beneath the printhead. If the label width and ribbon width do not suit each other, exposed ribbon may rub against the media path. It is easy to blame the ribbon too soon. Check the label roll and its alignment as well.

Printer parts can add friction or heat. A worn platen roller may pull media unevenly, while a dirty printhead or bent guide can snag the foil. Excessive darkness or speed settings may also strain the ribbon, especially during dense printing. Pause the printer and inspect the path with the power off. Check gently. Replace damaged parts rather than forcing the ribbon through. One detail is easy to miss: a slightly skewed roll may print normally for a while, then snap after repeated movement. Recheck alignment after loading.

How to Trace Foil Breakage and Correct Its Underlying Cause

Repeated foil breaks are clues, not just interruptions. Their location and shape can help narrow down the cause. Check the break. A clean tear near the supply roll may point to excessive tension or a snag. Frayed edges can suggest rubbing against a guide, while creases may indicate misalignment. These signs are useful, but they are not proof on their own.

Turn off the printer and let hot parts cool before inspecting the foil path. Look for rough guide edges, dust on rollers, loose cores, and foil wound unevenly on the take-up spindle. Check whether the foil tracks straight, without touching the frame or forming wrinkles. Then confirm that its width and type suit the job and the material being printed. A small wrinkle near the printhead can become a repeated tear.

Change one setting at a time. Reduce tension slightly, or adjust alignment, then run a short test and record what changed. If breaks continue, inspect the printhead and platen for residue or uneven pressure; follow the equipment instructions for cleaning. It is tempting to blame tension immediately, but that can hide a worn guide or a poor fit. Diagnosis can be messy. Keep notes on break locations, settings, and roll changes. A recurring pattern is often more useful than one successful test.

Top 10 Reasons Your Ribbon Printer Keeps Snapping Foil - How to Trace Foil Breakage and Correct Its Underlying Cause

# Potential Cause Common Clues How to Check Corrective Action Priority
1 Excessive printhead pressure Foil breaks repeatedly in the print zone; transfer may appear unusually dark or heavy. Review the printer’s pressure setting and check whether the printhead or platen is applying uneven force. Reduce pressure in small increments, following the printer manual, and run a short test print. High
2 Incorrect heat or energy setting Foil looks scorched, brittle, or heavily transferred before it tears. Compare the heat setting with the material and foil supplier’s recommendations; check whether the setting was recently increased. Lower heat gradually and verify transfer quality at each adjustment rather than compensating with excessive pressure. High
3 Foil tension set too high The foil is taut across the path, and breaks may occur during feed, rewind, or acceleration. With the printer stopped, inspect the supply and take-up paths for excessive resistance or a tightly wound take-up roll. Set tension to the equipment’s recommended range and confirm the foil advances smoothly without slack or pulling. High
4 Wrinkled or misaligned foil path Creases, diagonal tracking, or edge damage appear before the break. Trace the foil from the supply roll through every guide and roller; check that the roll is seated squarely. Reload the foil straight, remove wrinkles, and align the roll and guides according to the threading diagram. High
5 Damaged or contaminated rollers Foil catches at the same point, or residue and uneven wear are visible on a roller. Inspect accessible rollers for adhesive, dust, nicks, flat spots, or rough surfaces while the machine is powered off. Clean only with an approved method; replace damaged rollers and avoid abrasive tools that can roughen their surfaces. High
6 Foil roll damage or poor storage Breakage continues with a particular roll; the roll may have crushed edges, telescoping, or visible creases. Inspect the roll edges and winding; check whether it was stored in a hot, humid, dusty, or direct-sunlight environment. Test a clean, undamaged roll and store unused foil in its packaging in a dry, temperature-stable area. Medium
7 Foil width or core mismatch The roll shifts sideways, rubs against holders, or does not sit securely on the spindle. Compare the roll width and core dimensions with the printer’s supported specifications; check for side-to-side movement. Use a compatible roll and correctly sized adapters, and secure the roll without pinching its edges. Medium
8 Worn or damaged printhead surface Transfer is inconsistent across the width, or foil repeatedly snags near a fixed point in the print area. Inspect the printhead for residue, scratches, or wear using the manufacturer’s safe inspection procedure. Clean with the approved printhead method; arrange service or replacement if the surface is damaged. Medium
9 Abrupt feed or rewind changes Foil snaps during starts, stops, direction changes, or rapid changes in print speed. Note when breaks occur and check feed, rewind, and speed settings for abrupt transitions or unusually high values. Use a stable speed and appropriate rewind settings; check for loose connectors or drive problems if movement is uneven. Medium
10 Foil type incompatible with the job or machine Breakage occurs across different settings, or the foil transfers poorly on the material being printed. Verify that the foil is intended for the printer’s process, substrate, and operating temperature range. Choose a compatible foil specification and confirm the recommended heat, pressure, and speed with the supplier. Medium

Practical tracing tip: Record the break location and the settings in use, then change one variable at a time. Power off the printer before clearing a jam or inspecting moving parts, and follow the equipment manual for cleaning and adjustment procedures.

FAQS

What can cause a printer ribbon to snap?

Uneven tension, a crooked roll, or a snagged guide can cause breaks. Small flaws matter.

How can I check whether the ribbon roll is fitted correctly?

Make sure the supply roll turns freely and the take-up core sits straight. Recheck alignment after loading.

Can the labels or other media contribute to ribbon breaks?

Yes. Rough, dusty, or mismatched media can increase drag. Check the label roll and its alignment, too.

What do different ribbon break patterns suggest?

A clean tear near the supply roll may point to tension or a snag. Frayed edges can suggest rubbing, while creases may indicate misalignment. These clues are not proof.

What printer parts should I inspect?

Look for a worn platen roller, a dirty printhead, bent guides, or residue. Turn off the printer and let hot parts cool first.

Could printer settings put extra strain on the ribbon?

Excessive darkness or speed may strain it, especially during dense printing. Change one setting at a time and run a short test.

How should I investigate repeated ribbon breaks?

Note where each break occurs, then check the foil path, rollers, guides, and roll fit. Record settings and roll changes. One successful test can mislead.

What should I do if the ribbon keeps snapping?

Follow the equipment instructions for cleaning. Replace damaged parts rather than forcing the ribbon through. Diagnosis can be messy.

Conclusion

This article explains how thermal transfer foil travels through a ribbon printer and why even small changes in tension, alignment, or movement can lead to a break. If you’re asking, “Why is my ribbon printer snapping the foil,” the answer may lie in the balance between heat, pressure, and printing speed. Excessive heat or pressure can weaken the foil, while settings that move the ribbon too quickly or unevenly may cause it to tear during a print run.

Foil snapping can also point to problems with the ribbon, printing media, or printer components, such as worn parts, obstructions, or incorrect loading. Rather than repeatedly replacing the foil, this guide outlines a practical way to trace when and where breakage occurs, check likely contributing factors, and adjust the underlying cause. A systematic approach can help restore consistent printing and reduce wasted material.

Amelia

Amelia

Amelia is a seasoned marketing professional with a wealth of expertise in our company’s core offerings. With an unwavering passion for driving growth and innovation, she plays a pivotal role in shaping our marketing strategies and enhancing brand visibility. A key aspect of her responsibilities......